RSVProcess: 5 steps to planning the perfect event

Events like conferences and customer meet-ups are critical to an organization’s success. For marketers, events are a chance to bring their brand to life—not to mention an opportunity to build person-to-person connections. But what you don’t see underneath the shiny surface of an awesome event is the team working hard behind the scenes to make it happen.
Event planning isn’t one of the most stressful jobs by accident. But with Asana, you can help ensure the success of your next event by getting the right plan in place.
Want to learn how to run your other marketing programs successfully? Get your free guide on how to create effective processes that turn your marketing strategy into results.
1. Create a workback schedule with prioritized to-dos and deadlines
So, you’re kicking off your next big event? Instead of immediately jumping into work, try and map out all the steps you’ll take from A to Z. When you create a thorough workback schedule up front, everybody on your event team has a clear idea of what work is needed, how they will contribute, and what deadlines they need to hit. And by mapping out the full extent of the work ahead, you’ll have a more realistic execution plan, instead of discovering a critical task later and having to divert resources or shift gears at the last minute.
Try and get as specific as possible and break up tasks into smaller pieces with milestones so they aren’t as daunting to get started on. You can start with a plan that looks something like the list below. If you use Asana, you can copy and paste it into a project, or get started with our event planning template.
- Write an event plan
- Finalize budget
- Confirm event venue
- Select catering
- Choose event theme
- Design creative concepts for event
- Set up an RSVP page
- Send invitations
- Advertise event
- Order giveaways
- Test A/V
- Finalize presentations
- Prepare all event collateral and giveaways
- Day of checklist
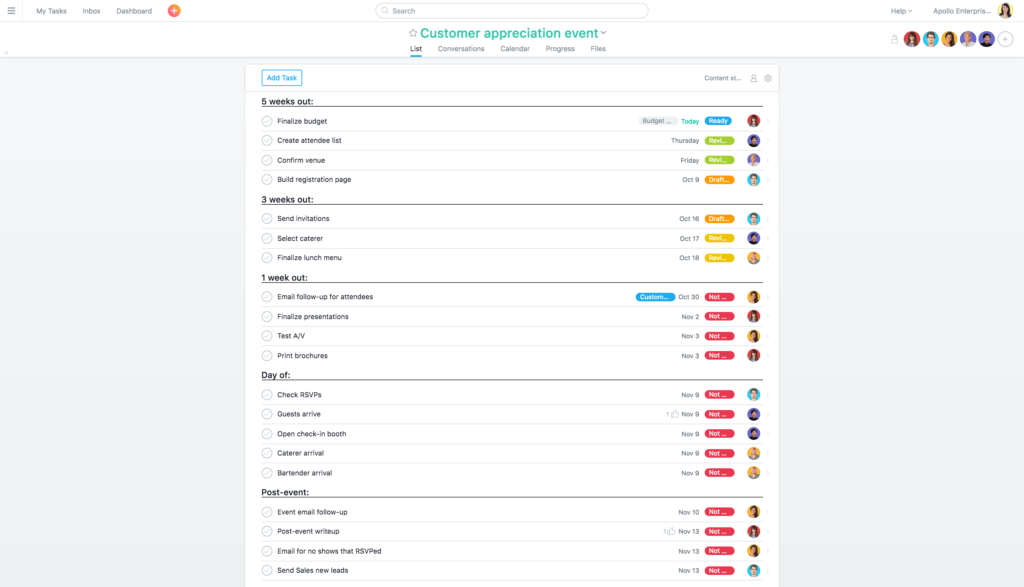
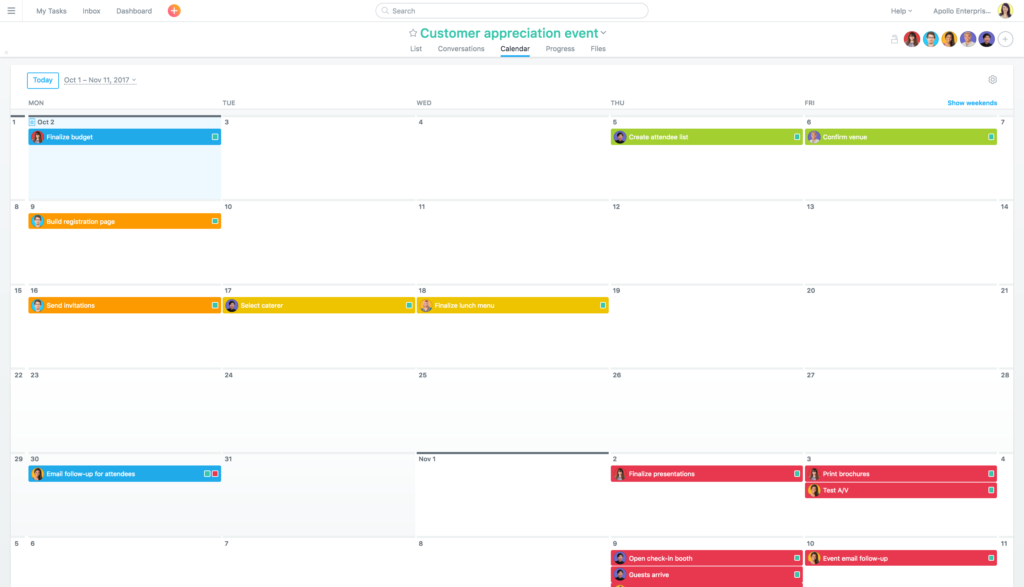
In Asana, you can build an event project with tasks for each to-do for your event. Use sections to organize tasks, and give them due dates so you can see them in Calendar View to make sure everything is going according to plan.
2. Post status updates at a consistent time and place
If you haven’t already, it’s time to loop in your team, as well as any agencies or contractors working with you on the event. Assign out tasks so it’s clear who is tackling what—and what the expectations are. That way, the person doing a specific piece of work knows what they’re responsible for, and others know who to reach out to if they have questions.
As your team gets to work on their individual to-dos, it can be hard to keep everybody on the same page about what’s happening. Calling meetings or weaving through long email chains usually isn’t the best use of everyone’s time just to review what’s been done and what’s up next. Instead, get in the habit of posting updates at a consistent time and place so people know when and where to expect them.
Using a shared platform like Asana is especially helpful, because you can use status updates and conversations to @mention existing tasks to show what’s been complete, what’s next, and where to go if anyone needs more information.
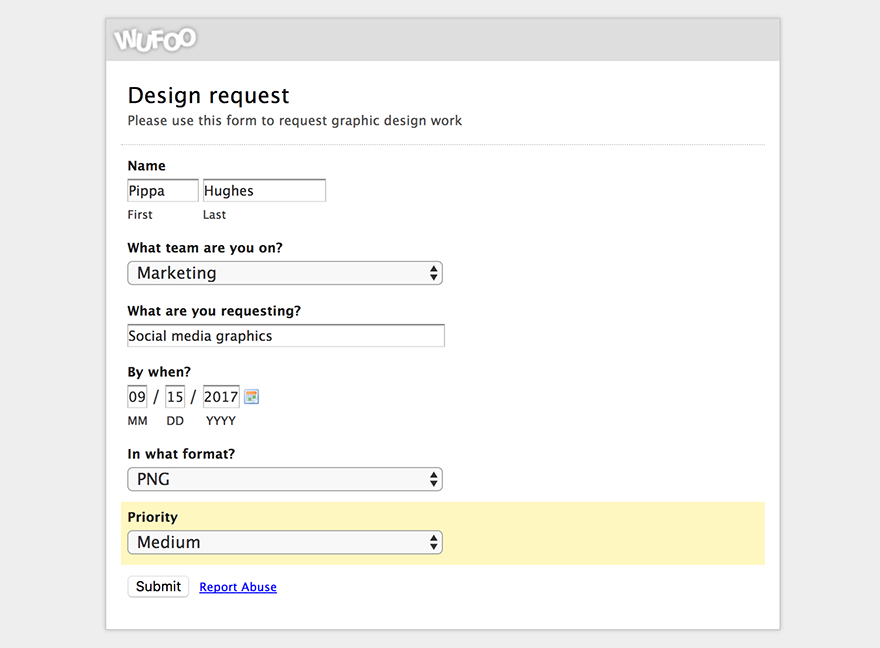
3. Have a system to capture requests
Despite how thoroughly you planned your event to-dos in step one, you might encounter new challenges and ideas along the way, like creating graphics in different sizes and formats or shipping last minute items to your event venue. Luckily, if you have a system to capture new requests and tasks, they won’t derail you completely.
Aim for a standard request form that captures the most important details needed by the requester and the “doer” so you can save time going back and forth about what is being asked.
With Asana, you can create a template task and copy it for each new request, or use a webform integration like Wufoo or Google Forms to create an Asana task when a form is submitted. The best part? You don’t have to manage an unwieldy amount of new requests via email.
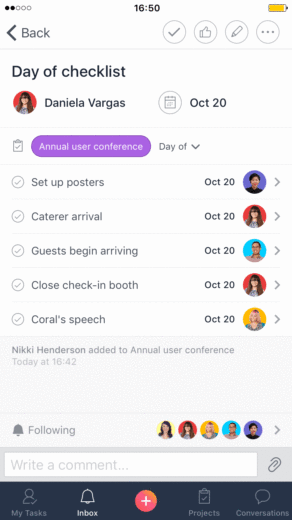
4. Have an accessible day-of checklist
Eventually, the day of the event will draw near, and you’ll want to make sure that you and your team are ready with a day-of timeline and checklist to make sure you don’t miss a beat.
Create a day-of checklist with specific due times. Then you can get everything in the right place at the right time, to greet attendees, set up signage, and queue up presentations seamlessly.
Teams using Asana can rely on our iOS or Android app to stay connected, even when they’re away from their desk. You can easily pull up a day-of checklist to mark things complete, and communicate with your team.
5. Create an event template and refine it after each event
Now that your event is over, first take a breath and celebrate. Once you’ve cleaned up the confetti, set yourself up for an even better event (and celebration). Look back on the event plan you made in the first step and reflect on how it went. Did you successfully map out your process and all the to-dos needed for the event? If so, this is a good place to start your template for future events.
In Asana, you can create a custom template project that you can copy for every event. Then you don’t have to reinvent the wheel every time and know that you’re following a process that works.
Planning an event can be demanding, and even more so when your process doesn’t work in your favor. By creating a solid plan, communicating effectively with your team, and staying on top of what you need to do before it happens, you can ensure your next event is a smashing success.